Luxrage
Well-Known Member
- Joined
- Apr 28, 2025
- Threads
- 4
- Messages
- 453
- Reaction score
- 644
- Location
- Sherman, TX
- Vehicles
- 1993 Geo Tracker, 1989 Ford Country Squire, 2007 Honda Element, 2011 Honda Fit
- Thread starter
- #1
As the Slate prototypes that have been shown thus far all have manually operated day/night flip mirrors. I'll show you the mod I've done to almost every car I own. It's a real game-changer and, depending on what route you go, really easy. My first car had one of Gentex's earliest 'modern' auto dimmer mirrors, so I am the most familiar the Gentex 4 and 7 pin mirrors and I put them in EVERYTHING. My Geo's burned through 3 of the traditional ones so I was pretty much forced to. I just did this mod on my Element this week, hence why it's so well documented (for their owners forum). That's also why it reads like an instruction guide and not just me telling you about it.
I'll add Slate specific points as I go along.
For mounting the mirror to the Element, I used this kit from etsy. We have not yet seen what Slate will do for the mirror mount, but if they are as DIY friendly as they claim to be, they'll show us the drawings for it in the future if an adapter needs to be made.
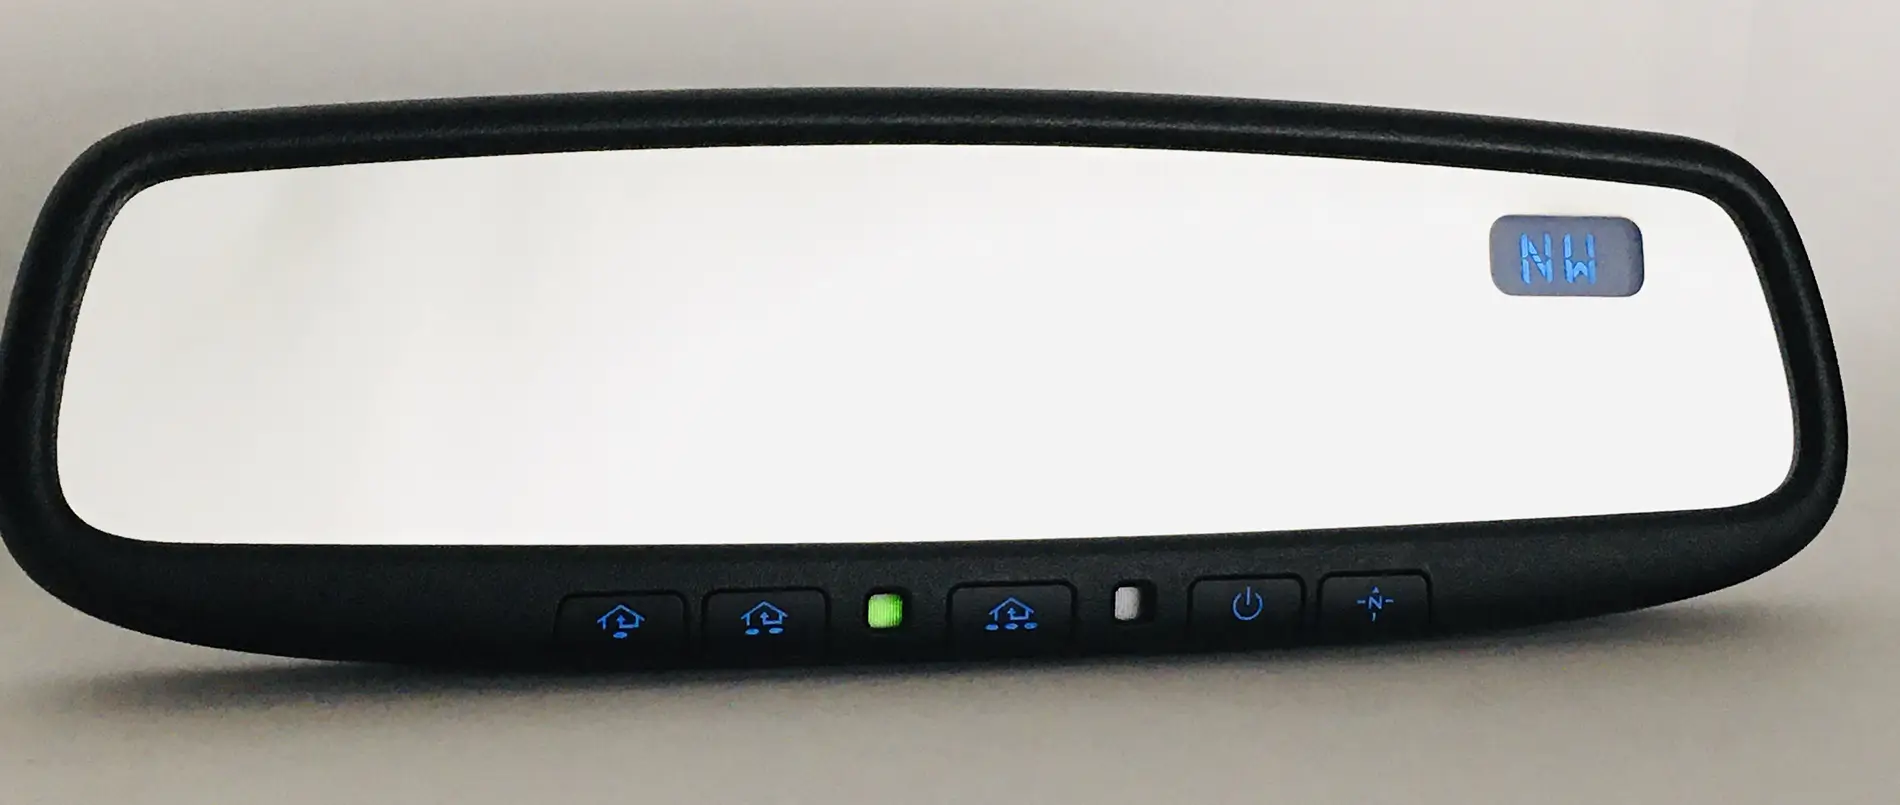
The Etsy 3D printer designed their installation guide around using a 5-series mirror from a Nissan Armada with homelink. However, at my local yards I was unable to source a 5-series mirror with the outside temp, and those used ORANGE LCDs instead of blue. The vehicle I pulled from was this 2006 Nissan Pathfinder. 4-series Gentex with blue LCD two-line screen. I pulled the outside temp sensor from the front radiator support to go along with it. $35.

The wiring for a Gentex mirror of just about any generation is very simple for non-homelink models. Switched power and ground for the mirror, and two wires that run to and from the temp sensor. On every Nissan the colors appear to be different, Titans had blue and purple and Armadas had a different configuration but they all use the same temp sensor. Best to get the matched pair so the colors match for ease of wiring.
Here’s a wiring diagram I whipped up for it, just for ease of viewing. On a Slate, if they have their switched 12V accessory circuits, we won't need a fuse tap.

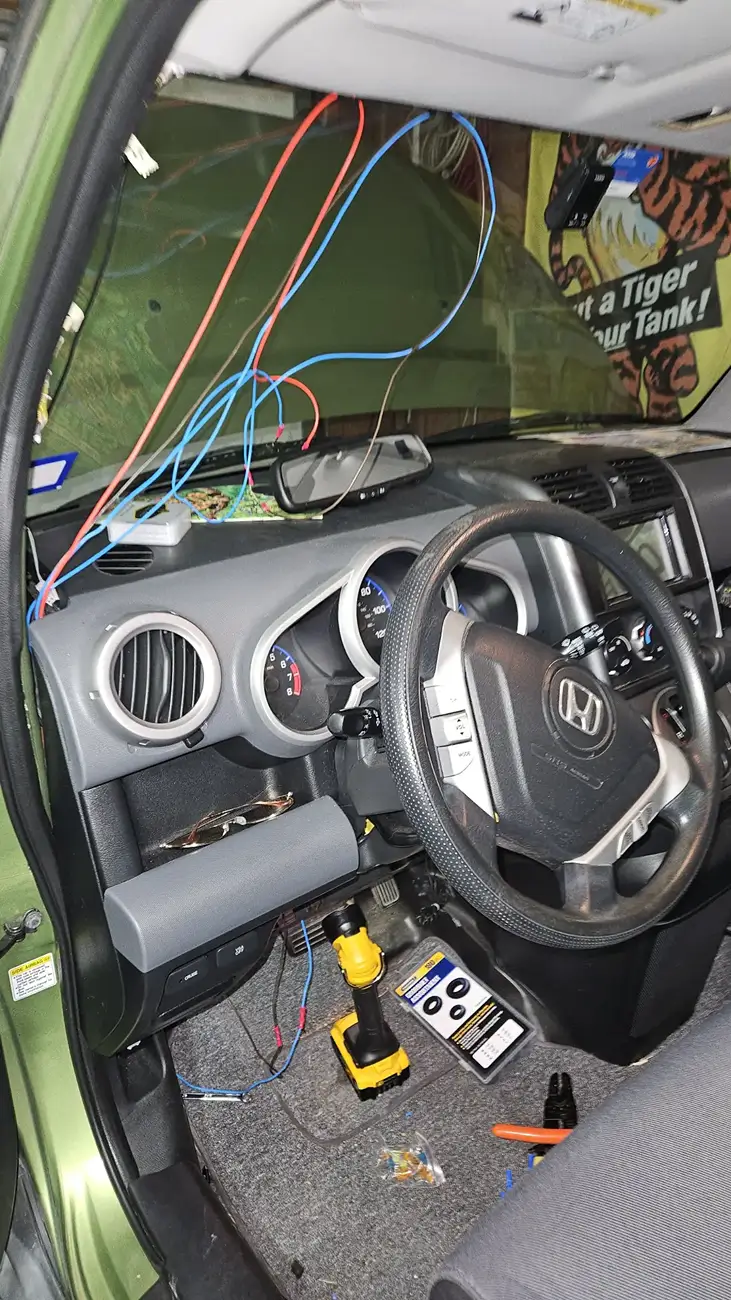
From there, I set about doing the wiring. I ran my wires along the windshield, at the top, over to the A pillar where I pulled that off and went straight down into a hole in the dash where the A pillar slots in. If you go a little towards the driver's seat you can drop the wires straight down to the foot well where you can get to the fuse box and any number of grounds. I wired the ground to a random bolt and the first switched supply I found was the fuse for the TPMS. Installed a fuse tap and was golden.
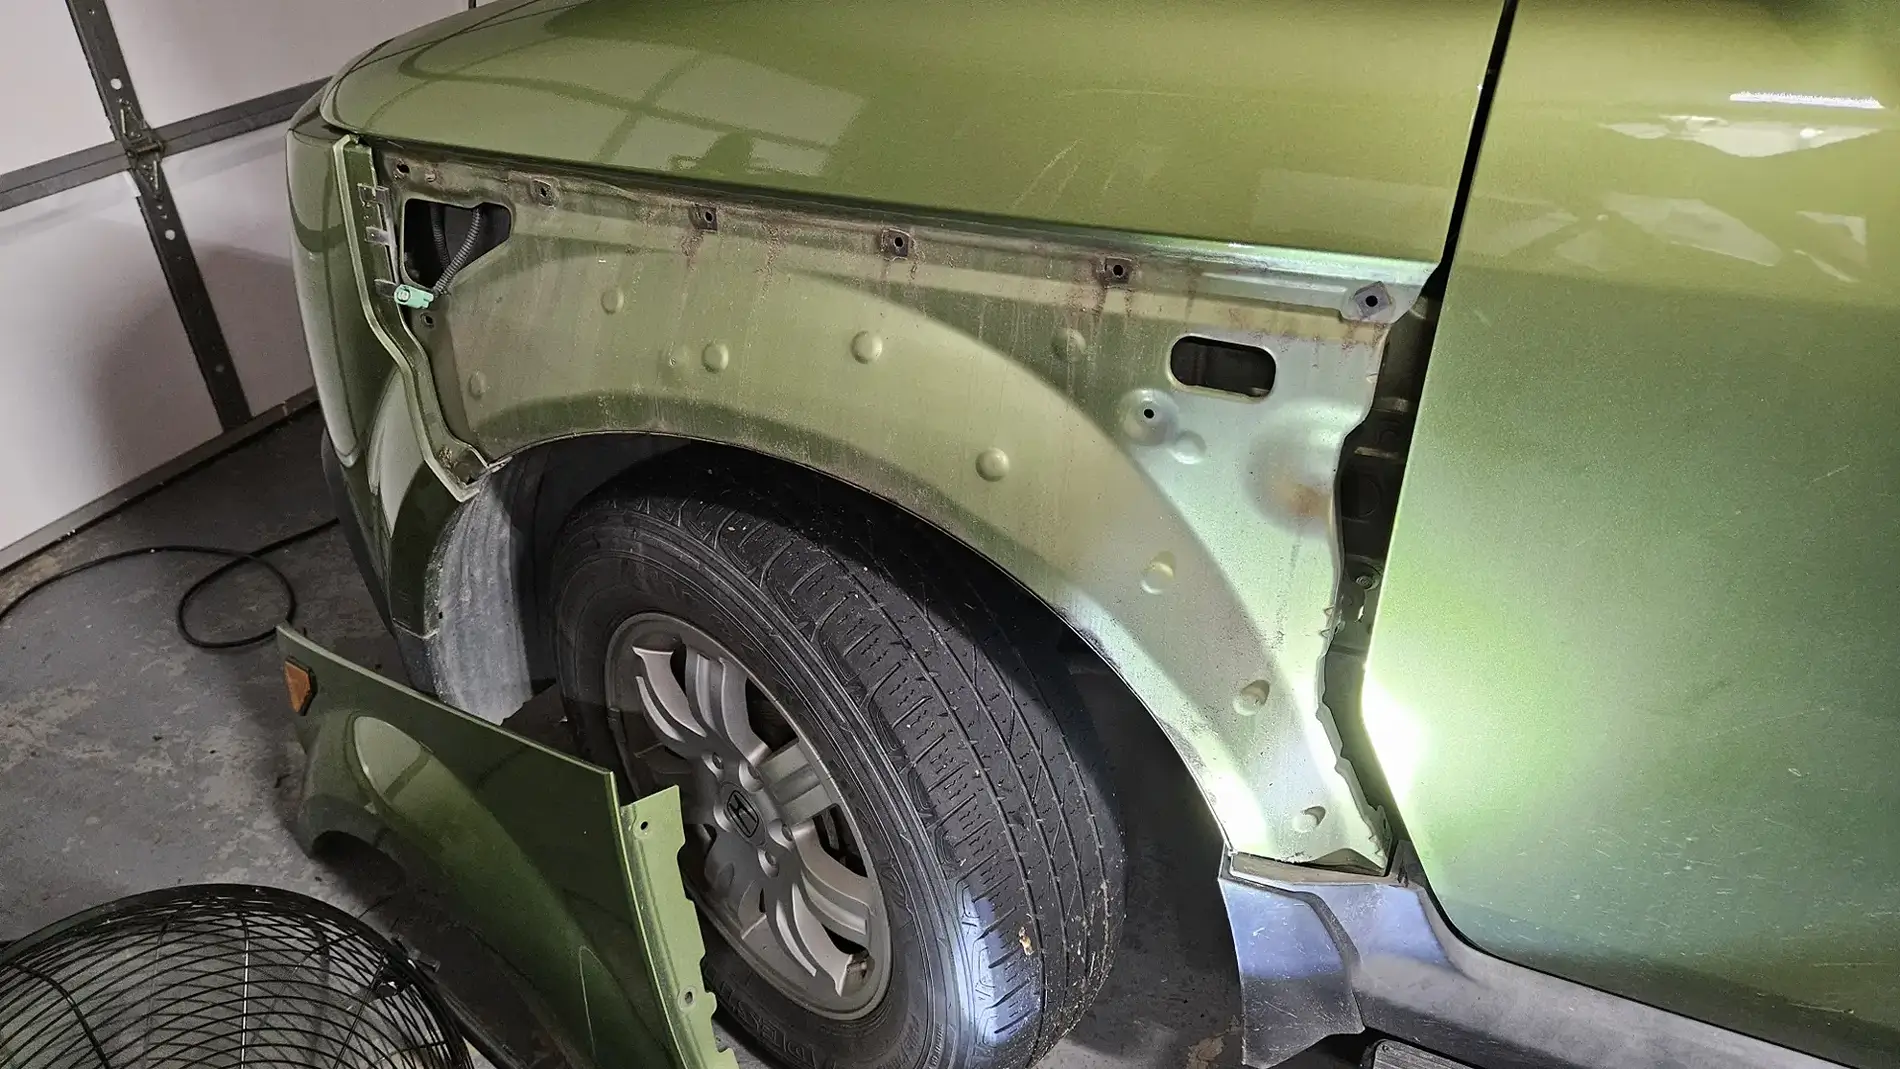
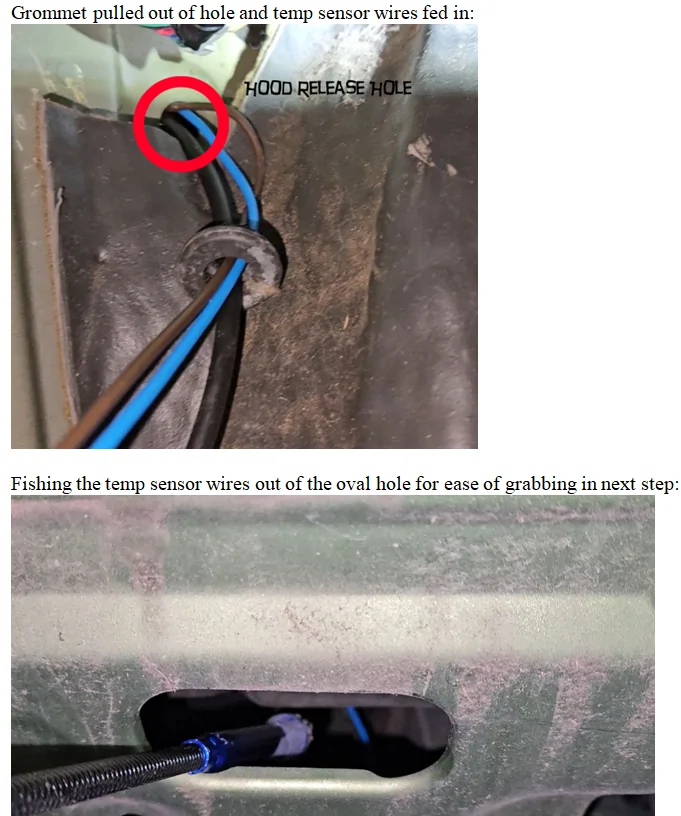
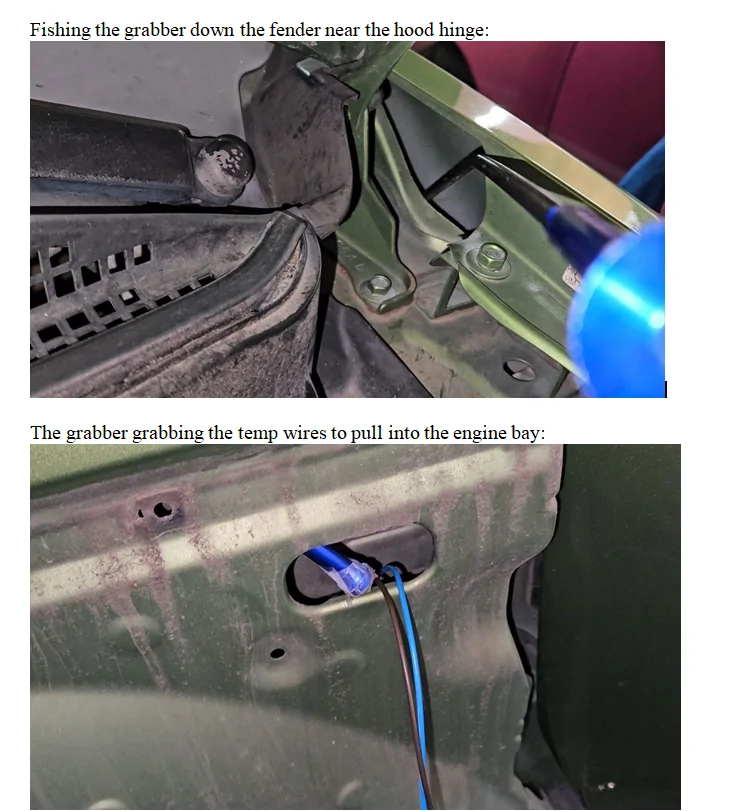
The real challenge came with getting the two temp wires to the front of the Element. I opted for the route of going through the grommet where the hood release cable runs through. That involves taking off the fender plastic or splash guard. I chose fender, as you could see the hood release cable through that oval hole on the right.
I'm hoping on Slates, they'll give us some ways of running cables for things like the addon foglights, accessories, etc.


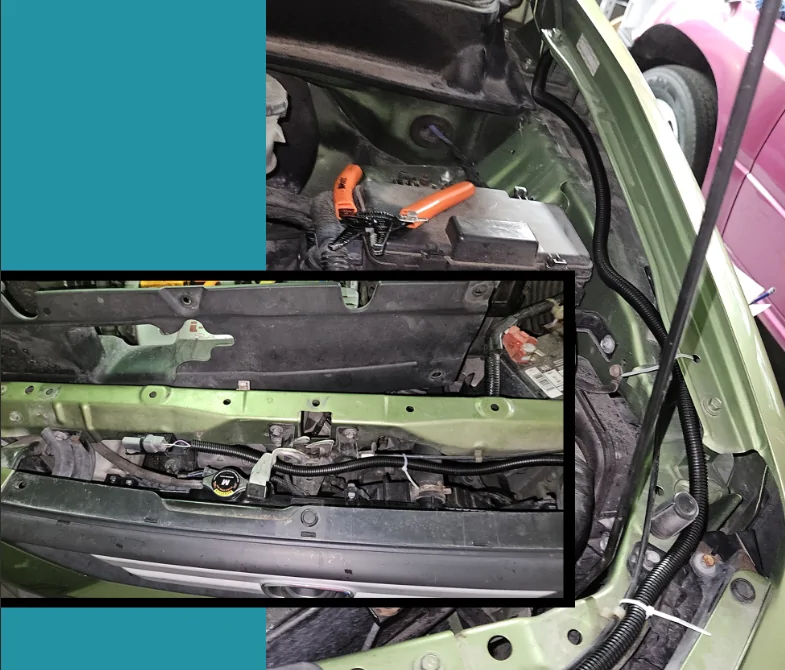
From there I ran them along the outside of the engine bay. The Etsy guide has a special bracket designed to mount the temp sensor down on a bumper brace, but I didn't have the time or the patience to fight with removing a bumper at 2AM so I went for a more conventional route. The Nissan Titan, Pathfinder, and Armada all had theirs in front of the radiator, so I picked an unused hole on the radiator support/hood release brace and mounted it up. The plastic cover hides it all:
I don't know how much heat will be up in the front from the battery cooling stuff, but it may be easier to put the outside temp sensor anywhere around the frunk.

To make things less crazy for running wires, I decided to run the temp wires from the mirror to the footwell, then run a separate set of wires from the foot well to the sensor in the engine bay. Then I'd crimp them together when it was all done. Helped split this sensor job into its own portion, separate from the mirror.

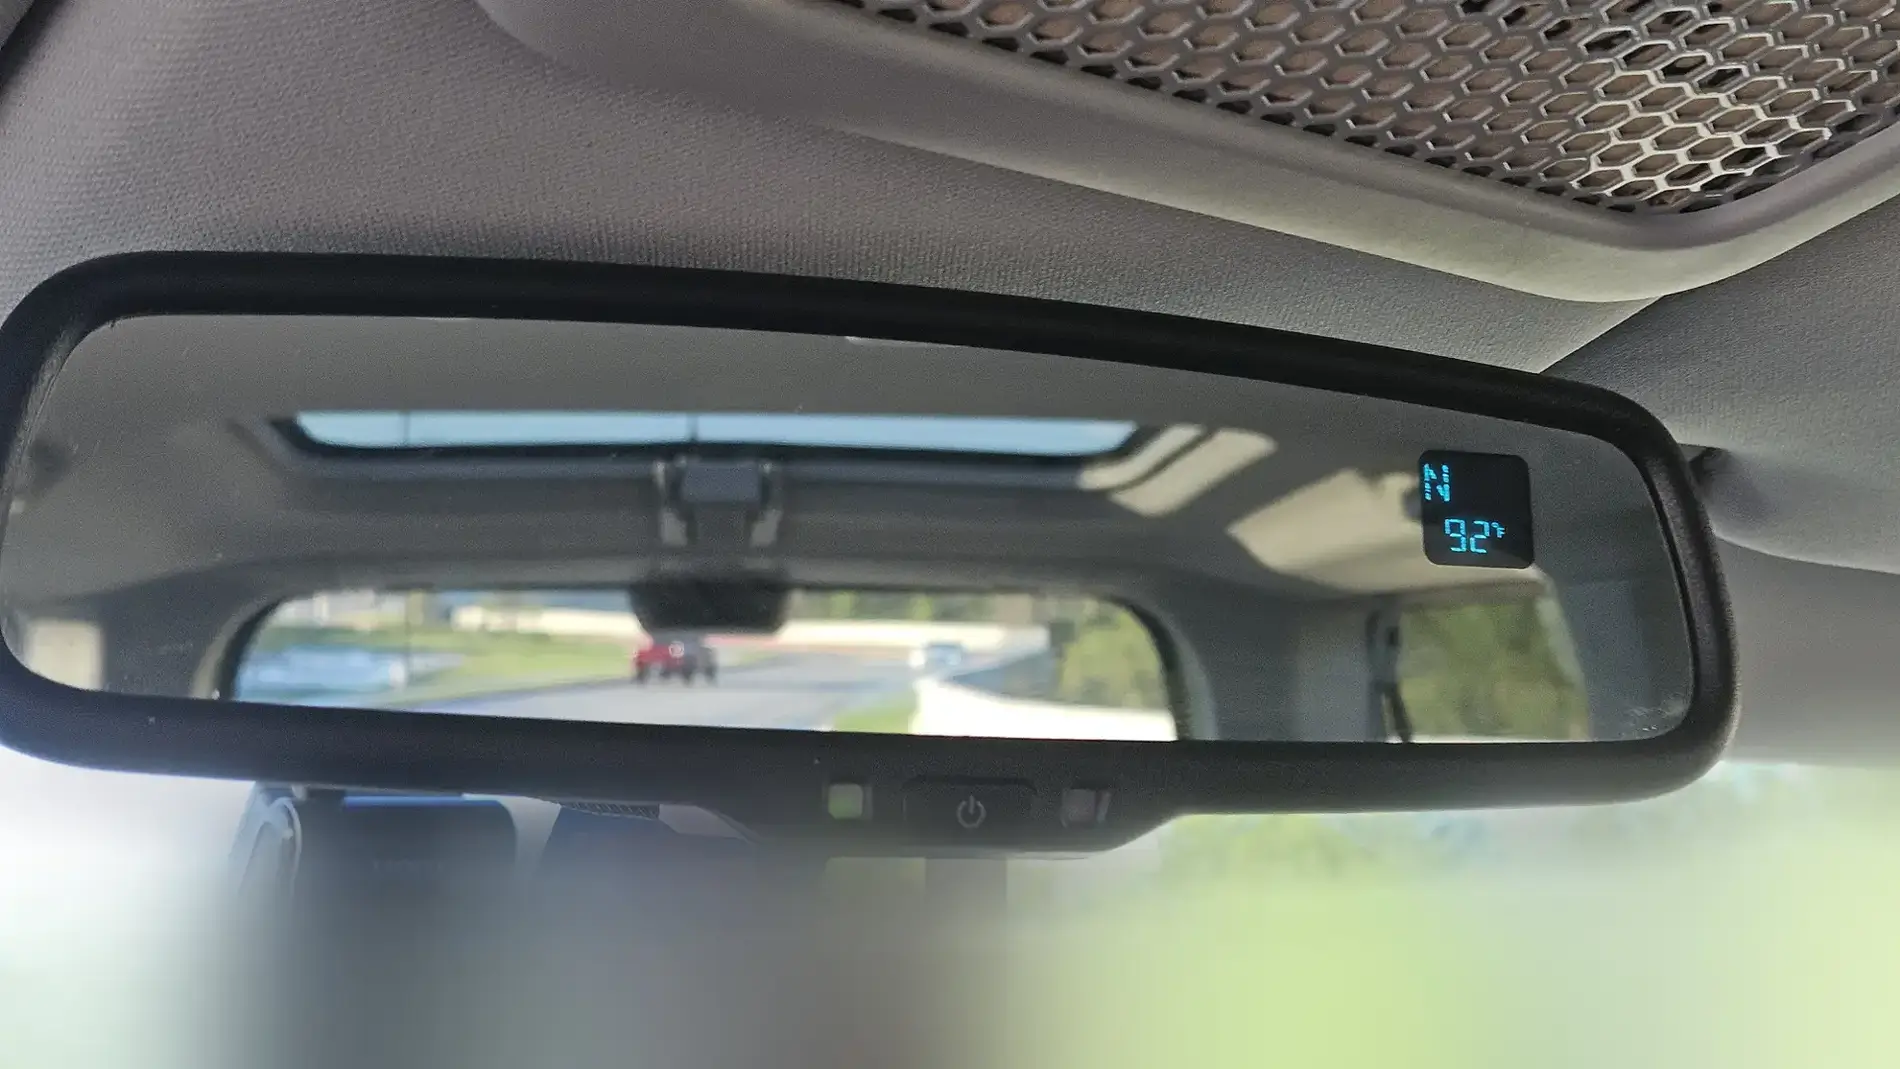
took it out for a drive and confirmed that it worked, it takes a few minutes to get its bearings but Nissan didn't have a dedicated constant power for it. It was intended to turn on with the truck and sort itself out.
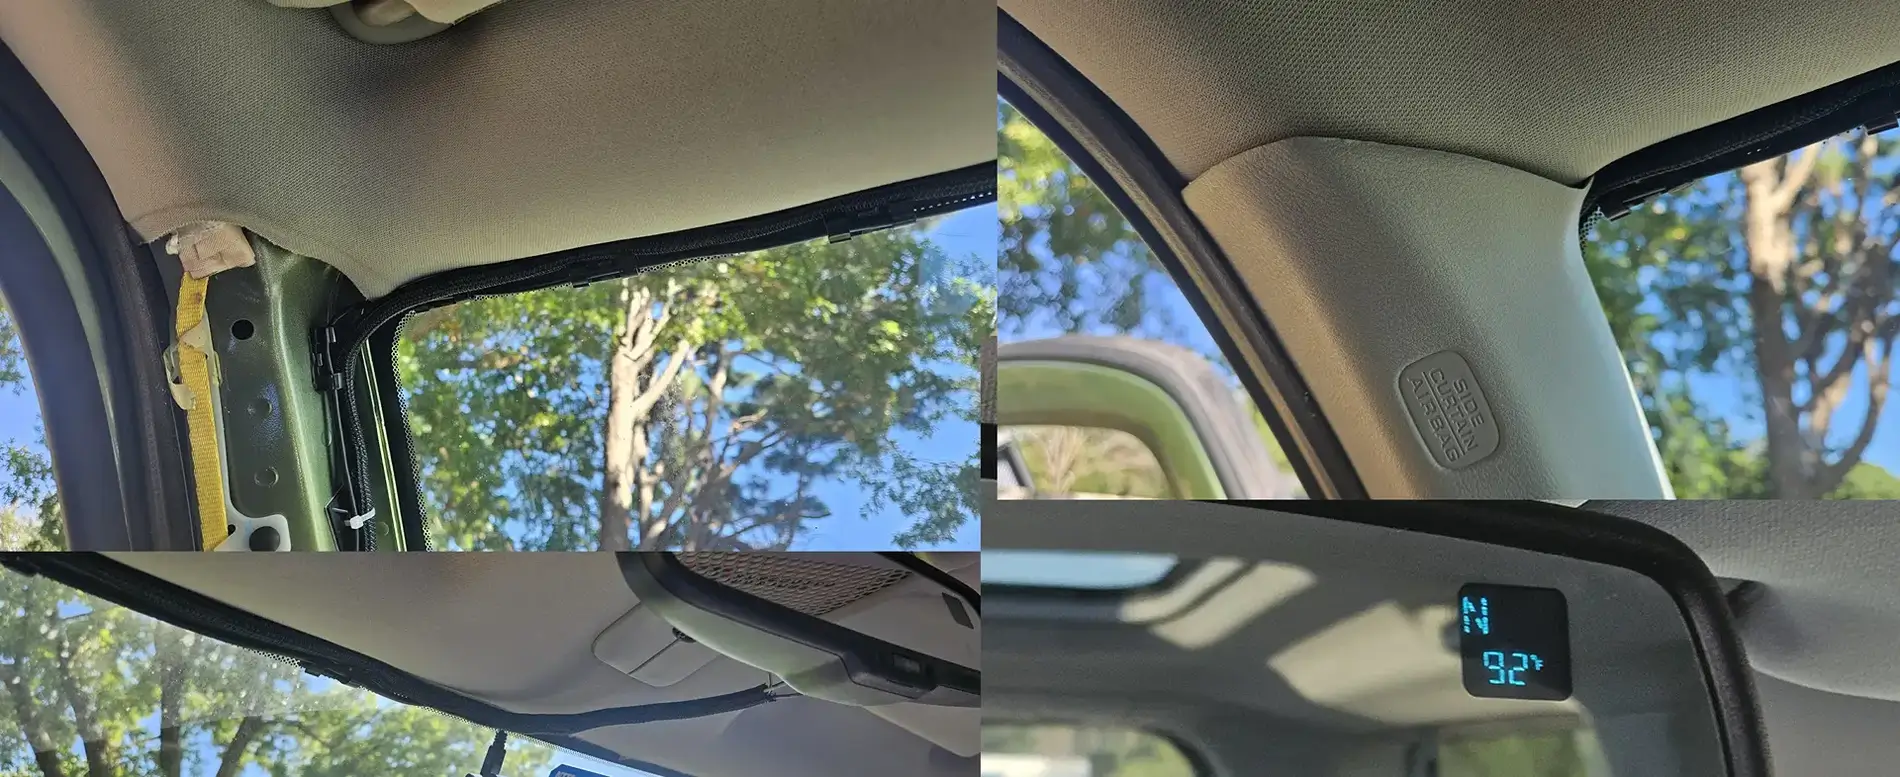
Fast forward to the morning. I got some split mesh tubing and tried to clean it up. My little C-clamp holders for my dashcam wiring were a bit too small for the job but it's holding for now. The A piller trim also doesn't quite sit flush at the top, I may need to trim a tiny corner off towards the windshield for the thick tubing to go through. I hope the headliner comes off easy on the Slate so this can be ran easier.

I know this writeup is a bit sloppy and I tried to condense the pictures together to make it fit in one post, but I just wanted to show that it's not terribly difficult to do the mirror swap. If I was using the homelink mirror that didn't have the temp sensor it would have been 10X easier as it just needs power. I'd like to test to see if the homelink models need constant power to keep the garage door settings or not. But if not it's as easy as fuse-tap to power and a ground! That way you could have a garage door opener built into your Slate.
This is one of those reasons why I was pushing for the 12V accessory circuits / BUS bar early on.
I'll add Slate specific points as I go along.
For mounting the mirror to the Element, I used this kit from etsy. We have not yet seen what Slate will do for the mirror mount, but if they are as DIY friendly as they claim to be, they'll show us the drawings for it in the future if an adapter needs to be made.
The Etsy 3D printer designed their installation guide around using a 5-series mirror from a Nissan Armada with homelink. However, at my local yards I was unable to source a 5-series mirror with the outside temp, and those used ORANGE LCDs instead of blue. The vehicle I pulled from was this 2006 Nissan Pathfinder. 4-series Gentex with blue LCD two-line screen. I pulled the outside temp sensor from the front radiator support to go along with it. $35.
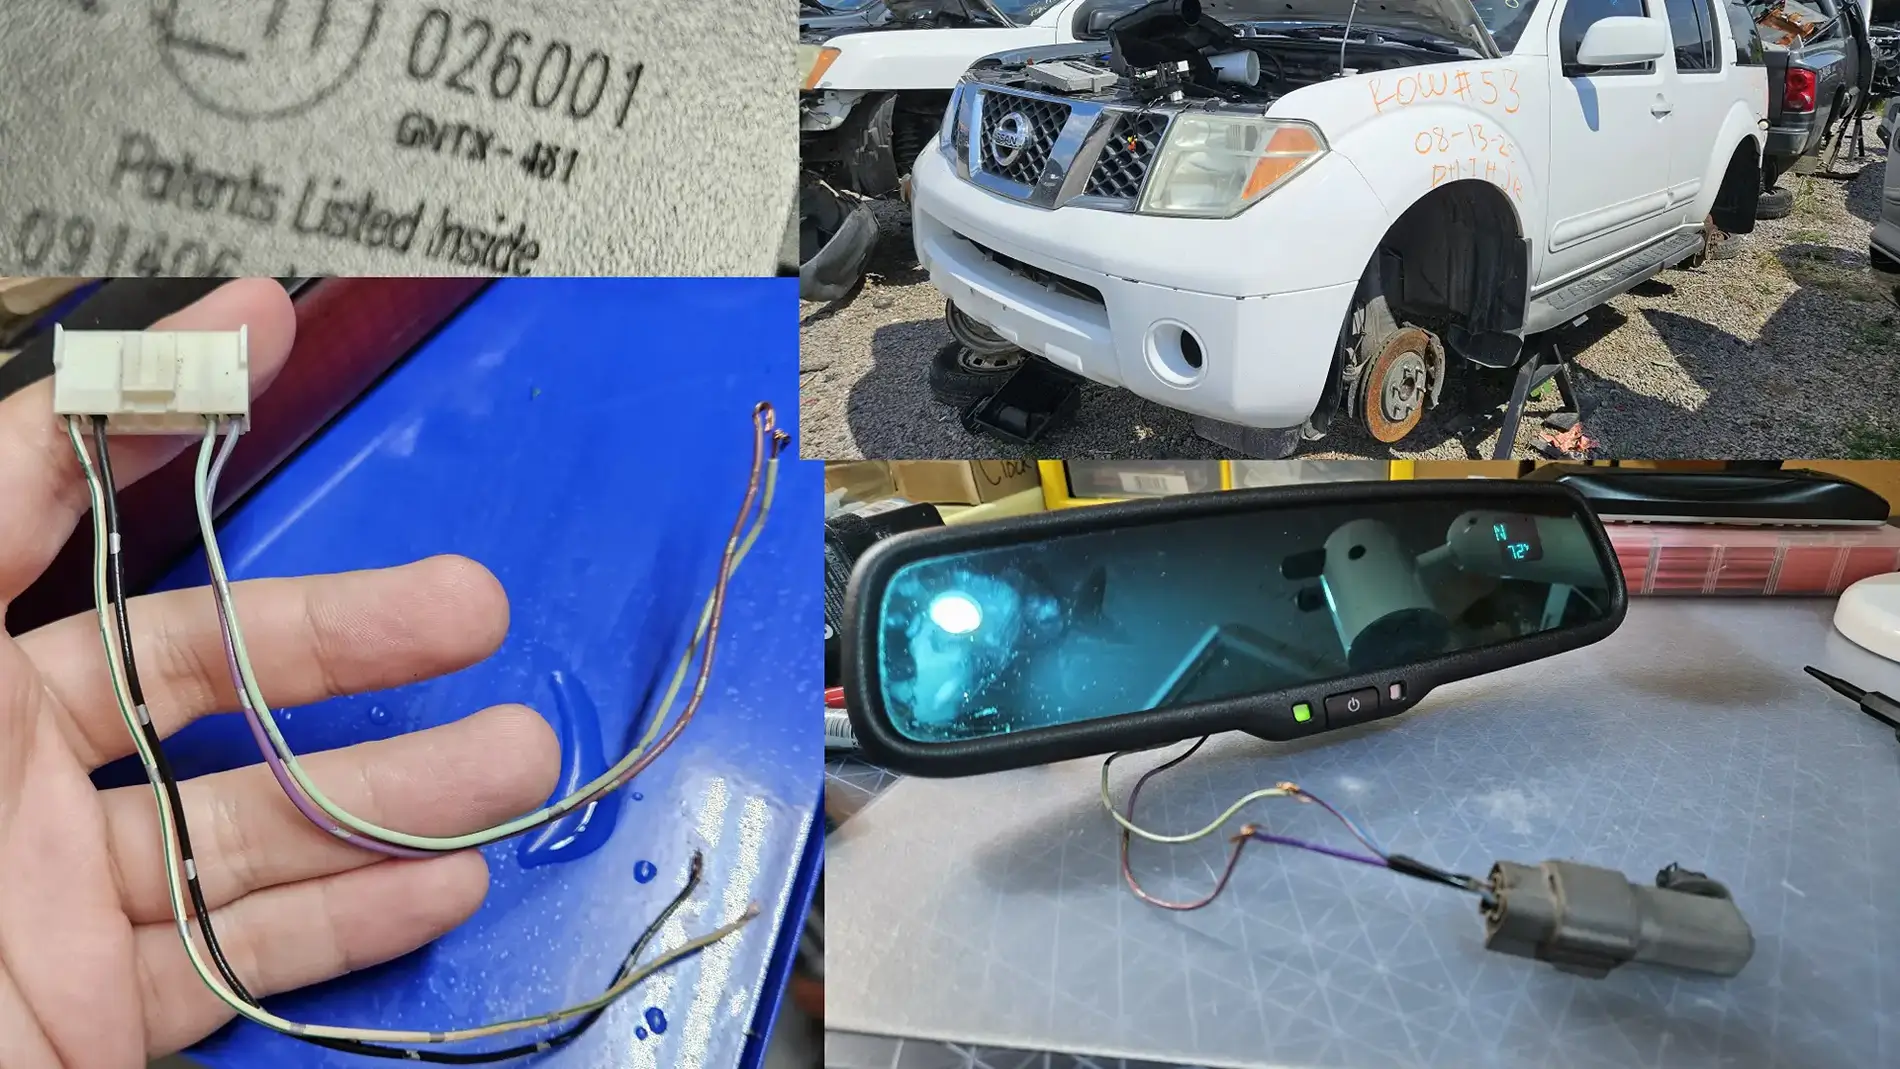
The wiring for a Gentex mirror of just about any generation is very simple for non-homelink models. Switched power and ground for the mirror, and two wires that run to and from the temp sensor. On every Nissan the colors appear to be different, Titans had blue and purple and Armadas had a different configuration but they all use the same temp sensor. Best to get the matched pair so the colors match for ease of wiring.
Here’s a wiring diagram I whipped up for it, just for ease of viewing. On a Slate, if they have their switched 12V accessory circuits, we won't need a fuse tap.
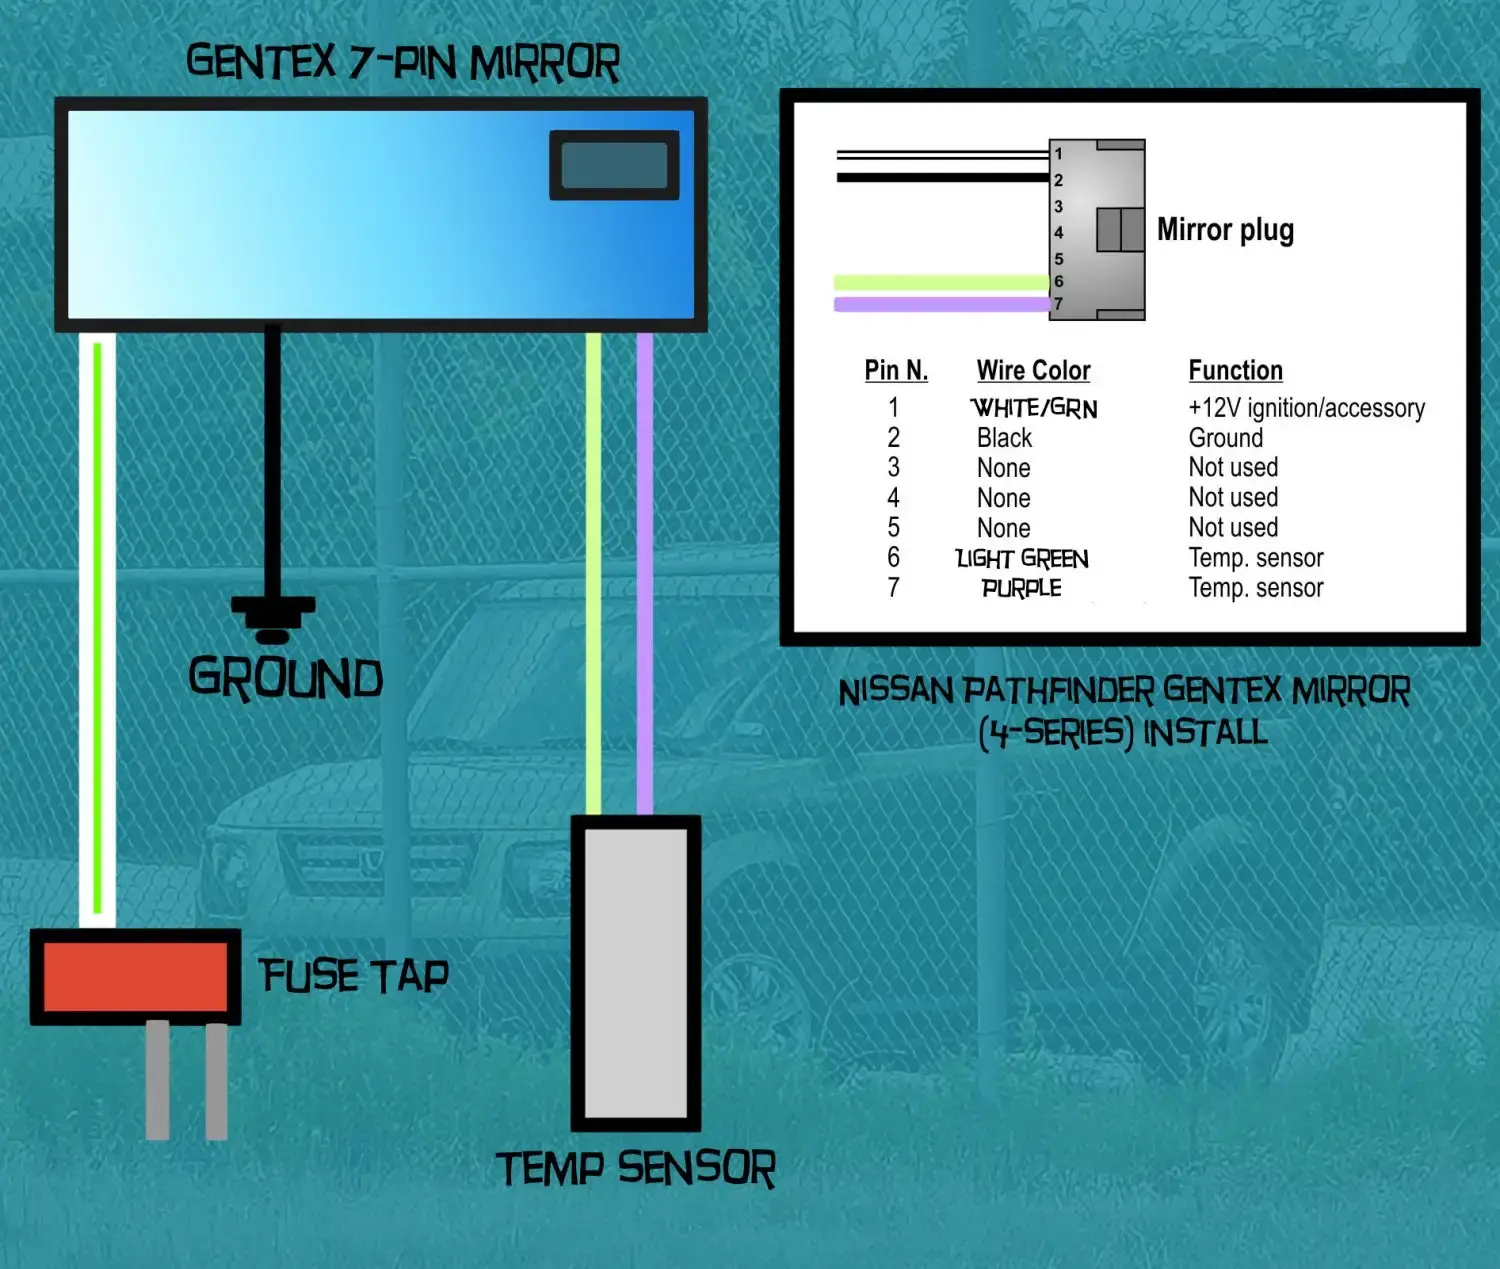
From there, I set about doing the wiring. I ran my wires along the windshield, at the top, over to the A pillar where I pulled that off and went straight down into a hole in the dash where the A pillar slots in. If you go a little towards the driver's seat you can drop the wires straight down to the foot well where you can get to the fuse box and any number of grounds. I wired the ground to a random bolt and the first switched supply I found was the fuse for the TPMS. Installed a fuse tap and was golden.
The real challenge came with getting the two temp wires to the front of the Element. I opted for the route of going through the grommet where the hood release cable runs through. That involves taking off the fender plastic or splash guard. I chose fender, as you could see the hood release cable through that oval hole on the right.
I'm hoping on Slates, they'll give us some ways of running cables for things like the addon foglights, accessories, etc.
From there I ran them along the outside of the engine bay. The Etsy guide has a special bracket designed to mount the temp sensor down on a bumper brace, but I didn't have the time or the patience to fight with removing a bumper at 2AM so I went for a more conventional route. The Nissan Titan, Pathfinder, and Armada all had theirs in front of the radiator, so I picked an unused hole on the radiator support/hood release brace and mounted it up. The plastic cover hides it all:
I don't know how much heat will be up in the front from the battery cooling stuff, but it may be easier to put the outside temp sensor anywhere around the frunk.
To make things less crazy for running wires, I decided to run the temp wires from the mirror to the footwell, then run a separate set of wires from the foot well to the sensor in the engine bay. Then I'd crimp them together when it was all done. Helped split this sensor job into its own portion, separate from the mirror.
took it out for a drive and confirmed that it worked, it takes a few minutes to get its bearings but Nissan didn't have a dedicated constant power for it. It was intended to turn on with the truck and sort itself out.
Fast forward to the morning. I got some split mesh tubing and tried to clean it up. My little C-clamp holders for my dashcam wiring were a bit too small for the job but it's holding for now. The A piller trim also doesn't quite sit flush at the top, I may need to trim a tiny corner off towards the windshield for the thick tubing to go through. I hope the headliner comes off easy on the Slate so this can be ran easier.
I know this writeup is a bit sloppy and I tried to condense the pictures together to make it fit in one post, but I just wanted to show that it's not terribly difficult to do the mirror swap. If I was using the homelink mirror that didn't have the temp sensor it would have been 10X easier as it just needs power. I'd like to test to see if the homelink models need constant power to keep the garage door settings or not. But if not it's as easy as fuse-tap to power and a ground! That way you could have a garage door opener built into your Slate.
This is one of those reasons why I was pushing for the 12V accessory circuits / BUS bar early on.

Last edited: